Never in a million years would I have thought I would be doing cloth diapers, let alone loving it, but we are. Devorah, a friend of mine, reintroduced me to the idea, so I guess you could say she is the one who put the bug into my head. Over the next few months I asked her many questions until I felt confident enough to jump into it. I must have asked her over 100 questions....
How do you handle messy diapers?
How do you get all of the poop off?
How do you change a cloth diaper when out in public?
What do you do with the dirty diaper when out in public or at a play date?
Can you bleach them?
What if the baby has a yeast infection?
Umm, diaper creams, lotions? Can I use them with cloth diapers?
How do you wash them, on what temperature and how often?
Do you put them in the dryer?
How many do I need?
How do you get stains out?
What name brands do you like? (My head was spinning with the choices.)
Before I continue, let me just say that by no means is this necessarily the best way to cloth diaper. Yes, I have found some mothers say not to use homemade soap because, although it is toxic free, it may cause build up in your diapers etc... What I am sharing with you, is our cloth diapering experience of the past 5 years. How we treat them, use them, store and wash etc.. It took 5 years of continual use for me to finally feel the need to replace some of our pre-folds. (Again, some.)
My parents did cloth diapers, using a local diaper service for many years, so the concept was not foreign to me, however I still never thought of cloth diapering as something I would do. My parents, having been cloth diaper pros, gave me some great tips and pointers which were very helpful. So after a few months of reading, asking questions and reading some more I was finally ready to start. I would like to share with you how we do it, all the way from the liquid laundry soap that we use, to handling those messy diapers on the go.
Our Homemade Liquid Laundry Soap
There are many recipes online for homemade liquid laundry soap, all similar to one another and very cost effective. Does it work? Well I think our sparkling white, clean cloth diapers, which have seen there share of the messy end of things speaks for itself. We pretty much used this recipe from
Wellness Mama, the only difference is that instead of using just one bar of soap we use two.
What you need:
Washing Soda,
Borax,
2 Bars of soap (We use Ivory.)
5 Gallon bucket
How it's Done:
1) Grate two bars of soap.
2) Add the shredded bars of soap to a pot filled with two quarts of hot water. Gently boil until completely dissolved. Set aside.
3) Fill your 5 gallon bucket with 4.5 Gallons of hot tap water.
4) Pour in 1 Cup of Borax and 1 Cup of Washing Soda. Mix well until dissolved.
5) Now add your dissolved soap mixture that you had set aside to the 4.5 gallons of water. (Now you have 5 gallons of liquid laundry soap.) MIX WELL!
6) Cover and let sit overnight.
7) Shake or stir, then pour into smaller containers so you can give it a quick shake before each use.
We use one cup per load. Enjoy!
I would like to add that on occasion I do add white vinegar and a scoop of Oxiclean. I understand that vinegar is not the greatest on the PUL fabric or the diaper covers, but we have been doing this for the past two years and the diapers seem none the worse for wear. One thing we do not do, is put the diaper covers in the dryer on high heat! Hang dry them to lengthen the life you get out of them.
We switched our diaper stash a couple of times before I found a brand which I love. We now use mostly Rumparooz diaper covers with the Osocozy pre-fold cloth diapers. The cloth diapers go into the dryer, but again, the diaper covers I always hang dry. I have found that putting PUL in the dryer, especially on high heat, dramatically shortens the life span of the diaper cover. In the winter they still dry pretty quickly in our chilly basement.
How do we handle the poop factor?
This tip came from my parents. Many parents today choose to set aside the messy diapers in a dry / wet bag for a day or two until they are ready to wash. While this is what I typically do, I do things a little differently if the diapers are particularly soiled, or if there is a stomach bug going through the house. When my parents did cloth diapering, the soiled diapers were put into a bucket filled with cold water and some borax. (Of course you need to make sure this bucket is out of reach from little explorers. You don't want anyone going in head first! We keep ours behind the basement door.) This functions as a pre-wash so when you are ready to wash your diapers they wash out beautifully. Occasionally I will also add some oxiclean and baking soda. In the past I have added tea tree essential oil and/or oregano essential oil if I suspected a yeast related rash. The essential oils help kill bacteria and any residual odor. Although the oregano is more potent and is said to kill any bacteria a bit more efficiently, I prefer the tea tree oil because it's not as pungent of a smell. Again, I don't typically add the essential oils because after a while it can cause build up in the diapers.
Another product that I found incredible helpful is Rockin' Green Funk Rock Ammonia Bouncer. In general, Rockin Green has some pretty awesome soaking and washing products for the cloth diapering family. Check them out on Amazon and read the reviews as well.
From Left to Right: Alva, Bumgenius 4.0 and Grovia Hybrid
I have since sold most of our Grovia and Bumgenius stash because I have found double gusset diapers to work much better for us, so these are pictures of our old stash. (In the pictures they are about one year old.) We now mostly use Thirsties and Rumparooz with pre-folds.
From Left to Right: Alva, Grovia and Bumgenius all nice and white.
Cloth Diapering on the Go...and which diapers we use.
These are the items I bring when we are out and about:
1) Clean, ready to use cloth diapers.
We have tried quite a few different brands of cloth diapers. I have learned that what works best for our babies and toddlers, are diapers with a double gussets. They seem to do a much better job at catching everything. We started out with BumGenius and Grovia Hybrid. I loved that they were so easy to use, as pre-folds and flat diapers seemed so daunting in the beginning. I have since sold and replaced them, and we now use diaper covers with double gussets from Rumparooz and Thirsties, with pre-fold cloth diapers from
OsoCozy (I have a few flat diapers). We also have a few diapers and training pants form Best Bottom. In the beginning I thought there was no way I was going to do pre-fold diapers. It just seemed way too complicated, however I have fallen in love with them. They are by far the most cost effective way of diapering and are really not so complicated after all. The diaper covers are also quite fitted, so I can get away without using any diaper pins or snappies. You do need to follow the pre washing instructions for the OsoCozy cloth diapers because it does help to ensure maximum absorbency.
2) A wet / dry bag to place any wet or soiled diapers into while on the go. (Yes, it's as simple as that!)
I like to add a few sprays of our homemade diaper spray into the wet bag. It has tea tree essential oil and lavender essential oil which helps
enormously with any smelly diapers as well as with bacteria. Tea Tree oil also has strong antiseptic and germicidal properties. (I don't think your average person will even get so much as a hint of any smell from a messy diaper on the go.)
As soon as we get home I scrape off what I can into the toilet and then transfer them to our larger wet-bag until ready to wash. If they are particularly soiled I let the diapers sit in a bucket of cold water and borax, baking soda and our homemade laundry soap. Again, this acts as a pre-soak and makes washing the diapers a dream. Our homemade liquid washing soap is also very effective in its cleaning ability and minimizes, if not eliminates the common cleaning problems that many moms face, like staining and residual smell when using the laundry soap on the market specifically for cloth diapers. Most of the time I really don't need the soak bucket, but one of our babies had particularly loose stool (until I figured out that gluten was the culprit), so those diapers typically soaked in a bucket for a day or two days until I was ready to wash them.
3) A spray bottle filled with our homemade
diaper wipe spray.
4) Pre-cut paper towels (I use this instead of baby wipes), or cloth wipes.
A couple of months ago I was brave enough to switch to cloth wipes, but if you choose paper towels I want to clarify here that in order to make the paper towel soft against the baby's skin, I would first spray the paper towel with a generous amount of liquid and
then wipe the baby's bottom with the moist paper towel which is now not abrasive anymore. It is so much easier to clean the baby's skin this way then with traditional disposable wipes. For a really messy diaper I find I don't need more then 4 small (half cut) pieces of paper towels or 2 cloth wipes. The homemade baby wipe spray also
really cleans. I never smell any lingering evidence on the baby's skin of what the previous diaper was cooking.
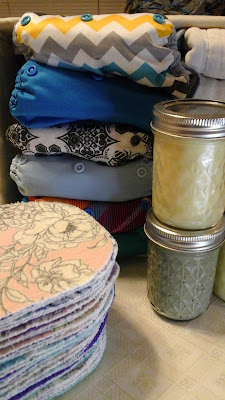
5) A small
tupperware or mason jar container filled with organic coconut oil or
french green clay that I use as a diaper cream. Two of our children had very sensitive skin and were constantly getting all kinds of diaper rashes despite allergy testing, steroid prescription creams, eliminating wheat, soy, dairy and nuts, you name it we did it and nothing seemed to work, until my sister-in-law introduced me to french green clay. I found there is a little science behind using it.
Diaper Rash
In the event of a diaper rash, I like to air out their bum with one or two cotton training pants. This is the equivalent of wearing cotton diapers without the diaper cover so their skin can really breath. An hour at a time is what I can do since I need to be on the look out for little puddles to wipe up. Preferably two times a day but even if I only do this once a day and the rest of the day use cloth diapers, the rash goes away much quicker then with disposables. My favorite "creams" to use are coconut oil with a few drops of Lavender, Tea Tree and Chamomile essential oils,
french green clay and a homemade herbal salve. We do experience dramatically less rashes in general with the cloth diapers then with disposables and since I have zeroed in on different food allergies and a little trick with the clay, thank G-d we have been rash free for quite some time now. If at any time I do notice a little bit of redness on the baby's bottom, I immediately use the clay or herbal salve and by the next couple of diaper changes, the redness is typically gone.
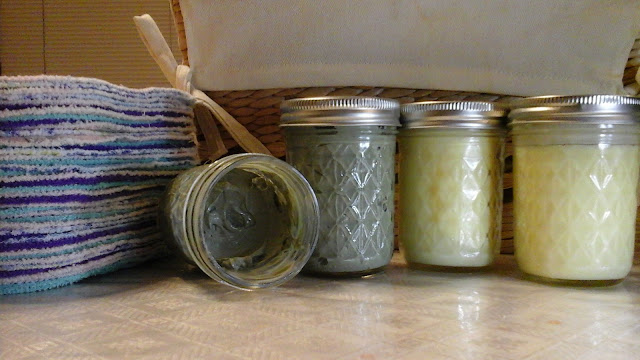
A Note on French Green Clay
One of my babies had such sensitive skin, despite cutting out dairy, gluten, nuts, soy and corn products. For a while we were doing organic disposable diapers and while that definitely made a positive difference, she would still, on occasion, wind up with a rash that left her skin with open wounds. Sometime after switching to cloth diapers I discovered the art behind using french green clay, and the result was a very happy toddler, or shall I say bottom....
So here is what we do. I put a few cups of distilled or reverse osmosis water into a container. I slowly keep adding tablespoons of the powdered clay as I use the immersion hand blender, until I get a nice smooth clay consistency. But here is the clincher. As you are slowly adding the clay, I also add melted Shea butter and Calendula oil, so the end result is a smooth green clay with a healing moisturizer carefully blended in. I found that when I would just use the French Green Clay without adding the Shea butter and Calendual oil, the skin, which is trying to heal, would stick to the clay and would slow down the healing as well as cause the wounded area to be quite uncomfortable. Adding Lavender, Tea Tree and Chamomile essential oils are also highly medicinal.
My friend Devorah explained to me that there are certain ingredients that should not be used with cloth diapers when using diaper rash creams or barriers for extra sensitive skin. It's a good thing she told me that because it didn't even dawn on me that some ingredients would pose a problem. I also found more information on
diaperwrecker.com.
Drying the Diapers
We line dry the covers or any pocket diapers. Many mothers have found sun drying them to help with any stubborn stains, but depending on where you live that may not always be an option. I would love to sun them, but often times the weather doesn't permit that, so instead they get the glorious view of our basement. Pre-folds we put in the dryer.
Let me know if I can answer any more questions!
- Matana B
Photos below by Mendel B

 Every milestone took great effort on your part. It has been amazing to watch your persistence and patience. There were many times I felt tears welling up inside me as I watched you struggle, but then I would see your determination and courage. You have strength I could only wish for and G-d has blessed you with a great gift, because your mountain is an awesome one. Climb your mountain, little one, but please, may I be so humble as to ask for you to take me with you.


